So please stay tuned :)

Thursday 3 December 2015
Revamp
Starting in January my blog is going to be completely different. Instead of go using on one category I will talk about anything that interested me and hopefully you. The new interface should also be a lot more user friends.
Wednesday 21 October 2015
Cleaning my brushes

To start with I have three dirty brushes. One dirty with powder - blue eyeshow which is usually difficult to get off, one with cream and one with a sticky lipgloss so you guys can see truely how effective this method is.

And all you need is a sink, a bar of soap and your brushes.
I'm using a body shop soap , which is only £2. As you can see I use this soap very often. It's so quick and easy that I often wash my brushes every time I use them - like I am suppose to. Hehe. 
First step is to turn the tap on and wet the brush by dipping it into the water. Don't run it directly under the tap because of water gets into the ferrel the glue will losisen and all the bristles will fall out. It's also best if you use hot water as this will get rid of any oils or grease on the brushes.

Then swirl it out in the soap.

Now rinse and repeat until the brush is clean.
To let them dry I hang them over the edge of my sink so that no water drips down the brush. I would leave at least over night but leave them for two nights of possible.

And it's that simple. Each brush takes me about 12 seconds super quick and easy :).
Clean practically new brushes.

Saturday 26 September 2015


Saturday 19 September 2015
DIY Cuticle and nail moisturiser
I am going out tonight and i just realised that my cuticles are awful. I tend to pick at them so you can imagine how horrible they are. I'll spare you the picture. I don't have any cuticle cream at the moment so I decided to make some. I love this home remedy I think it is equal to any expensive product and virtually free.
Here' what you will need:

To start with I put about 5 table spoons of lard into my cup. All these measurements aren't exact so just adjust them if you feel you should. Also I noticed that most recipes use olive oil however I preferred to use lard as it has more of a cream like consistency.

I then put this in the microwave for about 1 minute to melt it down a bit but you need it completely liquid. You just want it to be a consistency where you can easily mix ingredients in.

Next i stabbed a hole in the omega 3 tables so that I could mix in the fish oil. I just used three so not to make the mixture too liquid. I also added in some vanilla scent because this mixture smells really bad. At this point you could also add some spices to add some colour. Sppices work much better as food colouring is likely to leave a stain on your skin.

Next I added sugar just so I could have a scrub element to my cuticle cream. I added about 2 tea spoons off sugar and I found this to be the perfect amount of scrub.

Next I put it in the crush so it would return to a cream like consistency. You have to leave it for about 10 minutes.

This makes about a shot glass full of cuticle cream and I don't think you can make much more because if you leave this product for too long it will go bad.
So that's how I make my cuticle cream. Let me know if you try it :)
Love Emma x
Here' what you will need:
To start with I put about 5 table spoons of lard into my cup. All these measurements aren't exact so just adjust them if you feel you should. Also I noticed that most recipes use olive oil however I preferred to use lard as it has more of a cream like consistency.
I then put this in the microwave for about 1 minute to melt it down a bit but you need it completely liquid. You just want it to be a consistency where you can easily mix ingredients in.
Next i stabbed a hole in the omega 3 tables so that I could mix in the fish oil. I just used three so not to make the mixture too liquid. I also added in some vanilla scent because this mixture smells really bad. At this point you could also add some spices to add some colour. Sppices work much better as food colouring is likely to leave a stain on your skin.
Next I added sugar just so I could have a scrub element to my cuticle cream. I added about 2 tea spoons off sugar and I found this to be the perfect amount of scrub.
Next I put it in the crush so it would return to a cream like consistency. You have to leave it for about 10 minutes.
This makes about a shot glass full of cuticle cream and I don't think you can make much more because if you leave this product for too long it will go bad.
So that's how I make my cuticle cream. Let me know if you try it :)
Love Emma x
Monday 31 August 2015
Nostalgic childhood memories and DKNY
I was just watching a Trisha Paytas ( this is her channel) haul video and ten a favourite video where she mentioned DKNY Perfume in Be Delious. In the video she mentions that there is a massize hype about this perfume and I didn't know that there was I hype about this product.

They say that scents are the things that are most likely to bring up memories. Well this perfum reminds me of some childhood memories that I have of me and my friend sneaking into her mums bathroom so that we could use her make up and perfume. She only had one perfume and it was this one, DKNY Be Delicious. I was intised by the amazing, fresh but yet feminine apple sent and the cool, sleek bottle with an awesome way of spraying it. As my mum is alleric to perfumes this was the first proper adult perfume that I had seen I feel in love. This apple scent floods my mind with so many nostalgic but happy memories of innocent kids discovering make up for the first time.
The fact that their is still a hype about it shows how amazing this perfume must be. As any other curious person would do I went searching for the date it came out and I found out that this perfume has been around for 11 YEARS. That is right it came out in 2004. To be still be talked about it must be a pretty amazing product and .. well... it is!! It is a really light, fresh, gentle but yet you smell of fruit smell. I love the smell of apple and what ever else is in the perfume, becasue it so fresh, and this smells just perfectly appley (and a bit cucumbery) with out being to sweet and smelling like a walking lolly pop.
I just can't believe this is still going so strong and it has brought up loads of happy childhood memories. What smell reminds you of a happy memories? Seeing that Trisha video made me really happy as I am fully of happy memories and the fact that I knew it before it was cool. Haha
Love em x
Mini IKEA Haul
Before you get excited this isn't a huge home wear haul. It's just a couple of bits and bobs that I wanted to share with you. To me IKEA, and Costco, are like heaven. I spend hours and hour strolling through the shops picking out little accessories although I only came to buy a shelf. Today I did a quick shop but none the less I wanted to share it with you. In no particular order ...
TRENSUM mirror

I already owned this mirror but I broke both sides so I treated myself to a new one. It did require a little bit of self assembling but it was very easily done and anyone could have done it. I really like this mirror as it is double sided (one side is magnified) and therefore perfect for doing both your make up and your hair.
KORKEN mason jars

I feel like I am possibly one of the last people on earth to get some of these but I was waiting until I actually had a reason to get them. I am having a little gathering as it is my birthday soon so I thought that they would look very pretty on the table with some sort of sweets in it. Any Ideas? I need two good sweets. :) I can then reuse them later for storing nail varnishes, making jams or something along those lines.
SINNLING Apple scented candle

I love candles, especially fresh smells. These candles are a really cool bright colour and the smell really nice. For 75p you can't really go wrong.

30 x SOMMAR raspberry napkins
Design - Maria Vinka

As I said before I am having a gathering for my birthday and these were to cute not to pick up. At IKEA there was a huge range of colours, shapes and patterns but eventually I choose these. There just 30 simple square napkins with red raspberries on one side and pink raspberries on the other.

That's all I bought this time. I hope you enjoyed my haul and let me know what your favourite IKEA item or department is.
Love Em x
Tuesday 25 August 2015
DIY MUA Palette

Here's what you will need:

1. First thing you will need to do is put your palette on heated straighteners for about thirty seconds but use your own judgment to stop your self setting the house on fire. Placing a sheet of paper I between means that melted plastic won't ruin your straighteners.

2. Using a pin or a sharp pointy object remove the casing that holds the shadows but be careful not to break it as we will need it to reassemble the pallet.


3. Slide your pin under each eyeshadow pan and gently remove then. Careful not to crush the eyeshadow in the process. Don't worry about the glue that is left behind as it will be covered up by eyeshadows.


4. Next you want to glue the casing back in. I tried to arable the Rushdie without any casing and either way you can only fit twelve eyeshadows so it's up to you. At this point you may also want to clean up your pallet using some rubbing alcohol.

5. Now it's time to decide what colours you want in your pallet. If are using super glue you want to be careful as it is very strong and you are unlikely to be able to remove the eyeshadows again. If you are using a hot glue gun you don't need to worry as much.
I chose two of my favourite light browns, two of my favourite medium browns, two dark browns and approximately one eyeshadow for every colour of the rainbow.

6. And to finish off I glued in all my eyeshadows. I tried applying the glue to the bottom of the pan but I found that the most efficient and less messy method was to stick them down onto a pre-glued surface.

And that is how I cleared out my pallet draw. This method should work for almost all brands but I know that it defiantly works for MUA.


Emma :)
Friday 14 August 2015
Concelear tips
It's been a long time since I first discovered make up and although there is so much more to learn I have had my fair share of experience. Concelear is often the area in make up that is the hardest to get right so I wanted to share with you my tips and advice.

In no particular order ...
Set your concelear straight away
I don't know if this tip is obvious but I always thought that I should let my concelear settle before I set it. However to avoid creasing under the eye or around the mouth you should set your concelear with a powder straight away.
Two different concelear work best (a light one and a skin tone one)
If you use a brightening concelear under your eyes then also use it on your spots you will be highlighting the spot which is the opposite of what your trying to achieve. You need a separate concelear that matched your skin tone to cover any imperfections.
Concelears can change colour
Some cream and liquid concelears (and foundations) can oxadise meaning that they react with the oxygen and turn a darker, more orange colour. I suggest that you leave the concelear on your hand for five minutes before you choose your final colour.
Avoid using fingers under your eyes
If you use your finger your are more likely to tug at your eyes which will cause premature wrinkles. If you prefers to use your finger (to avoid cleaning brushes or because your using a solid concealer) use your least dominate finger, your ring finger, to avoid tugging to much.
Warm up any solid concelears
Solid concelears, like stick concelears tend to be harder to work with as the just sit on the skins and slid around. If you rub the product with your finger first it will warm up a bit and melt into the skin, making it appear less cakey and stopping it sliding around. You can also use a lighter to lightly heat the top but this isn't as effective as you can risk melting the product. Also you have to wait for it to cool down so you don't burn your skin.
Use coloured concelears
To fight redness use a green coloured concelear as it is opposite in the colour wheel and will neutralise the skin. Obviously you will have to go over it in your normal concelear after. You can also do this for green undereye circles using redy pink concelears. If you don't want to buy a concealer you can get using a red lipstick instead but this might feel a but oily on the skin. Here is a colour wheel so you can hide any colour you want. You cover it with the opposite colour.

Matching your foundations and concelears
Try using this website to see what what shade you should be according to past foundations and concelears. Or you can start fresh and see what colours it suggests. http://www.temptalia.com/foundation-matrix?fm=find
Obviously this is not a complete list as there is so much more to learn. Let me know in the comments your favourite concelear tips (whether I mentioned it or not).
I hope this helped :)
Emma x
I hope this helped :)
Emma x
Sunday 2 August 2015
Hit or Miss list
As I try new products and test new brands I can sometimes forget what I like and what I don't. I created this list to keep tabs on everything and also let you know about my opinion on certain products. Their like mini reviews.
I hate saying this but I feel I have to. I have not been payed to say anything and all of these opinions are my own honest opinions. Also products can vary depending to climate, skin type and also sometimes by batch so don't rely on what I say. Just take it into consideration. If you disagree with my opinion let me and everyone else know in the comments. If there is anything you want me to try let me know and also let me know if there is anything you want me to review in greater detail.
All products are in alphabetical order so you can go straight to what your looking for. :)
Boots Tee tree and which hazel facial mask - MISS
When I bought this I thought it would be great as it from boots and therefor a simple recipe but also it has active charcoal which I have heard is very good for your skin. However for me it didn't 'deep cleanse' like it said and it caused me to break out. Even if that was just because of my specific skin type it still doesn't leave you feeling clean and rejuvenated. It's a shame because I love a good, inexpensive face mask.
Collection Gorgeous GLOW 2. Bronzing Brick
This is a drugstore dupe for nars' Shimmer brick and its so gorgeous. If you only ever get one highlighter it has to be this one. It has five different colours so you can pick or just use them all together. I love using this to highlight my face and also as eyeshdows. Defiantly recommend it.
Elizabeth Arden Flawless Finish Sponge on Cream Make Up - MISS
The colour of this product is gorgeous and matte so it looks amazing on the skin but it is impossible to blend. You have to blend it out with your fingers otherwise it won't blend so if you already have foundation on you will ruin it. For the price you would expect something that blends out easily and doesn't ruin the rest of your make up.
MAC 3D Extreme Lash
I love this mascara as it gives a full glamorous eye lash look with one coat. It lasts all day and doesn't smudge. What else could you want from a mascara.
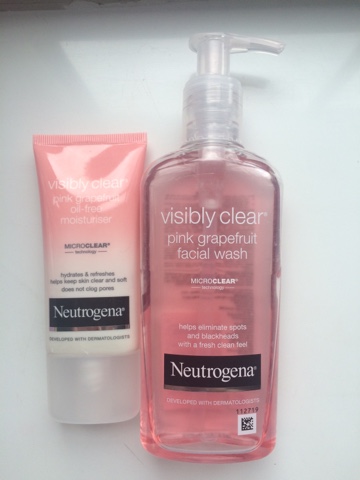
Neutrogena visibly clear pink grapefruit facial wash - MISS unless you have dry skin.
This face wash doesn't leave your skin feeling dry and stripped however it doesn't actually do anything therefore it is pointless unless you have dry skin. It's doesn't leave you with that clean feeling that I look for. It's doesn't cause any breakouts however it doesn't actually prevent them like it was designed to. This product is disappointing as it has such a lovely colour and fresh smell.
Revolution Iconic Pro palette - MISS
Although the colours are beautiful they are not pigmented at all. You have to apply many layers and if I try to blend the colours they disappear.
Revolution Lipstick in Deprived - MISS
I loved the colour of this lipstick but it has terrible pigmentation and lasts three seconds. If you rub your lips together it all disappears so you cant talk and you have to be perfectly still. I don't know if this is a reflection on all of the revolution lipsticks but this one is very disappointing.
Rimmel Brow This Way - MISS
This brow gel is useless.It doesn't keep your brow hairs down instead they look all gloppy and wet. Also it h=gave me spots on my eyebrows, which I didn't know was possible, but that might be just my skin.
Rimmel Scandaleyes show off mascara - HIT
I really like this mascara because with one coat you get natural lashes and with two coats you get glamorous heavy eyelashes and bonus - it lasts all day without smudging.
SLEEK Blush by Three Pumpkin 363 - HIT
Its no secret that Sleek blushes are amazing. They come in a variety of gorgeous, extremely pigmented colours. I love how the palette comes with a bluish for every occasion; Lantern, Squash and P Pie. My favorite is defiantly lantern - a matte orange colour.
Wax lyrical dragon fruit candle - HIT
I love the smell and bright pink colour of this candle. It's a fresh but yet not pungent smell. It last for a very long time and when it is burning it subtly fills the room with a sweet, fresh smell.
Monday 27 July 2015
My summer toiletry bag ☼
This summer I will be spending a couple weeks in Italy and France which means I get to pack. Although I hate packing clothes, for some strange reason, I love packing my beauty products. My plan is to share all my packing with you starting with my toiletries.


This is the wash bag,from Primark, that I will be taking on the trip. It's my go to bag because its big, about A5 size, waterproof and it's quite cute as well.
I also carry another bag inside that. I use this banana bag from H&M to store all my shower and face wash iteams so that I can take this into the shower with out getting any of my other stuff wet. It also means that I'm not rummaging through a big bag when I am in a hurry.
For body wash I am using the body shops pink grapefruit shower gel. I got this in a little travel size set with a body butter, which I'm also taking, and a body scrub. The body butter is going in my pink bag where as the shower gel is going into my banana bag because I will be taking this into the shower. I am not taking the scrub because you don't want to exfoliate your tan away.This is by far one of my favorite scents. The body shop pink grapefruit range smells so good and its also a very cute dusty rose colour.
Since I am traveling my euro tunnel I have no liquid limit. This means that I can carry my full size face wash and moistener. I am just taking the neutragina pink grapefruit face wash and oil free moisteriser. The face wash is quite good for travel because the pump twists to lock closed meaning that you can avoid any spillages.
Next in the banana bag is my razor. I am not picky when it comes to razors and i just choose this because of the pretty colour. I only use my razor to shave my armpits and any regrowth on my legs. This particular razor is scented which I don't really like because I feel like it might irritate my skin and its not the nicest of smells. I am awful at describing scents so the best I can do is compare it to detergent. Apart from my tooth brush and tooth paste that is everything that is in my banana bag. I like to keep this bag in the bathroom for about a week before the trip and that way if I use something from the bathroom that's not in the bag I know I forgot to pack it.
The body spray I'm taking is Butterfly by Limited collection. I choose this because its the most slender bottle that will fit easily in my bag. It is also a very nice fresh smell. It quite a common smell so I am sure you would have smelt something similar to it. I am bringing a body spray instead of a perfume because in the summerI feel a body spray is more refreshing.
I am not taking a travel size deodorant instead I am taking the new compressed cans because they are smaller but they still have the same amount of product which is convenient for traveling when its hot.
I have a small bottle of kids sun screen. I have a kids bottle because I have sensitive skin and I find sunscreen to be very irritant on skin. This is also ideal for the summer as it's water (sea,pool and sweat) resistant.
Picking my nail varnishes was so hard but what I did was split all my nail varnishes into different categories like pink, blue, glitter, etc. and then pick one polish from each category. These are the colours I choose. For nail care I also packed a nail file, nail clipper and nail varnish remover pads.
I also have some baby wipes. I have this instead of make up wipes because it has a clip lid so the wipes don't try out. The last little things that I have are a hair brush, hair bobbles, lip balm, cotton buds and cotton pads.
That's everything I will be bring. Let me know if I have forgot something and also in the comments tell what three items you would take to a desert Island. :) Bye x
Subscribe to:
Posts (Atom)